URLフィルタリング(その2)
「URLフィルタリング(その1)」の続きです。
ここでは、Router_Aの基本設定を行ってゆきます。
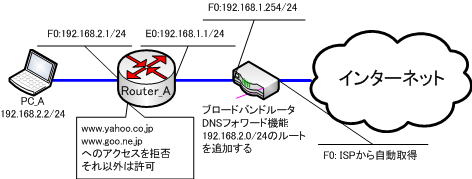
ネットワークの構成は、下図のとおりです。

※ブロードバンドルータには、IPマスカレードの設定をしておきます。
基本設定
まずは、ルータの名前を付けたり、パスワードを設定したり、インターフェイスにIPアドレスを設定していきます。
●基本設定(ホスト名・パスワード・インターフェイス)
Router(config)#hostname Router_A
Router_A(config)#enable password cisco
Router_A(config)#line vty 0 4
Router_A(config-line)#password cisco
Router_A(config-line)#login
Router_A(config-line)#exit
Router_A(config)#int e0
Router_A(config-if)#ip address 192.168.2.1 255.255.255.0
Router_A(config-if)#no shutdown
Router_A(config-if)#exit
Router_A(config)#int f0
Router_A(config-if)#ip address 192.168.1.1 255.255.255.0
Router_A(config-if)#no shutdown
Router_A(config-if)#exit
デフォルトルートの追加
インターネットへのルートを全て、デフォルトルートで解決します。
Router_Aにデフォルトルートの設定を行います。
●デフォルトルートの設定
Router_A(config)#ip route 0.0.0.0 0.0.0.0 192.168.1.254これで、Router_Aの基本設定は完了です。
ここまでのRouter_Aの設定を確認しておきます。
●Router_Aの設定
!
version 12.4
service config
service timestamps debug datetime msec
service timestamps log datetime msec
no service password-encryption
!
hostname Router_A
!
boot-start-marker
boot-end-marker
!
enable password cisco
!
no aaa new-model
memory-size iomem 25
!
ip cef
!
interface Ethernet0
 ip address 192.168.1.1 255.255.255.0
 half-duplex
!
interface FastEthernet0
 ip address 192.168.2.1 255.255.255.0
 speed auto
!
ip forward-protocol nd
ip route 0.0.0.0 0.0.0.0 192.168.1.254
no ip http server
no ip http secure-server
!
control-plane
!
line con 0
line aux 0
line vty 0 4
 password cisco
 login
!
end
URLフィルタリングの設定を行う前に、PC_Aからインターネットへ接続できるかどうかの確認を行ってみます。
続きは、次の「URLフィルタリング(その3)」で、解説していきます。
