このページで解説している内容は、以下の YouTube 動画の解説で見ることができます。
演習ファイルのダウンロード
ネットワークの構成を Packet Tracer で一から設定していくのは大変かと思います。「ダウンロード」から演習で使用するファイルのダウンロードができます。ファイルは、McAfee インターネットセキュリティでウイルスチェックをしておりますが、ダウンロードは自己責任でお願いいたします。
HSRP(二重化 その3)
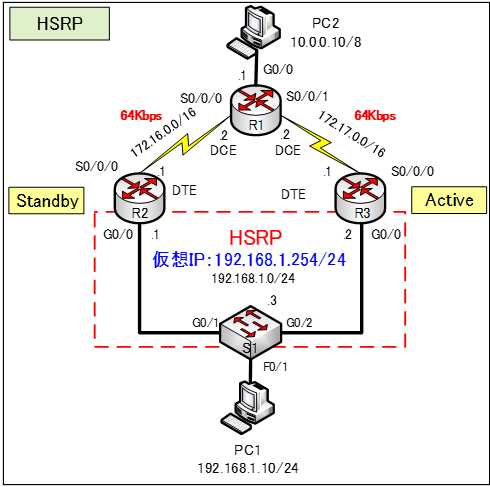
ここでは、下図のネットワークをHSRPで設定していきます。

基本設定
まずは、ホスト名やIPv4アドレスなどの基本設定を行います。各ルータやスイッチの設定は以下のとおりです。
●R1のコンフィグ
Router>enable
Router#conf t
Router(config)#hostname R1
R1(config)#int g0/0
R1(config-if)#ip address 10.0.0.1 255.0.0.1
R1(config-if)#no shutdown
R1(config-if)#int s0/0/0
R1(config-if)#ip address 172.16.0.2 255.255.0.0
R1(config-if)#clock rate 64000
R1(config-if)#bandwidth 64
R1(config-if)#no shutdown
R1(config-if)#int s0/0/1
R1(config-if)#ip address 172.17.0.2 255.255.0.0
R1(config-if)#clock rate 64000
R1(config-if)#bandwidth 64
R1(config-if)#no shutdown
R1(config-if)#router ospf 1
R1(config-router)#passive-interface g0/0
R1(config-router)#network 0.0.0.0 255.255.255.255 area 0
R1(config-router)#end
R1#copy run start
●R2のコンフィグ
Router>enable
Router#conf t
Router(config)#hostname R2
R2(config)#int g0/0
R2(config-if)#ip address 192.168.1.1 255.255.255.0
R2(config-if)#no shutdown
R2(config-if)#int s0/0/0
R2(config-if)#ip address 172.16.0.1 255.255.0.0
R2(config-if)#no shutdown
R2(config-if)#router ospf 1
R2(config-router)#passive-interface g0/0
R2(config-router)#network 0.0.0.0 255.255.255.255 area 0
R2(config-router)#end
R2#copy run start
●R3のコンフィグ
Router>enable
Router#conf t
Router(config)#hostname R3
R3(config)#int g0/0
R3(config-if)#ip address 192.168.1.2 255.255.255.0
R3(config-if)#no shutdown
R3(config-if)#int s0/0/0
R3(config-if)#ip address 172.17.0.1 255.255.0.0
R3(config-if)#no shutdown
R3(config-if)#router ospf 1
R3(config-router)#passive-interface g0/0
R3(config-router)#network 0.0.0.0 255.255.255.255 area 0
R3(config-router)#end
R3#copy run start
●S1のコンフィグ
Switch>enable
Switch#conf t
Switch(config)#hostname S1
S1(config)#ip default-gateway 192.168.1.3
S1(config)#int vlan 1
S1(config-if)#ip address 192.168.1.3 255.255.255.0
S1(config-if)#no shutdown
S1(config-if)#end
S1#copy run start
HSRPの設定
●R2のHSRPの設定
R2(config)#int g0/0
R2(config-if)#standby 1 ip 192.168.1.254
●R3のHSRPの設定
R3(config)#int g0/0
R3(config-if)#standby 1 ip 192.168.1.254
R3(config-if)#standby 1 priority 255
R2ルータ、R3ルータにおいて、HSRPグループ1に「192.168.1.254」の仮想IPアドレスを設定します。
R2ルータのプライオリティ値は設定しないため、デフォルト値の100になります。
R3ルータのプライオリティ値は、255を設定しています。
Activeルータは以下のルールで選出されます。
- プライオリティ値の高い方がActiveルータに選出される。
- プライオリティ値が同じ場合、大きいIPアドレスを持つルータがActiveルータに選出される。
※「2」の条件は、Packet Tracer では、うまく機能していません。
プライオリティ値の大きいR3ルータがActiveルータに選出されます。
これで、HSRPの基本的な設定は、完了です。
続きは、次の「HSRP(二重化 その4)」で、設定したHSRPを検証していきます。
