BGPの応用設定(その3)
※Packet Tracer では、iBGPをサポートしていないため、BGPのごく一部の機能しか試すことができません。細かな機能の検証については、実機が必要です。ここでは、実機で検証した結果を紹介しています。
今回、検証に使用したのは、Cisco2500シリーズのルータです。Cisco2500ルータは、中古で安く入手できるコストパフォーマンスに優れたルータです。
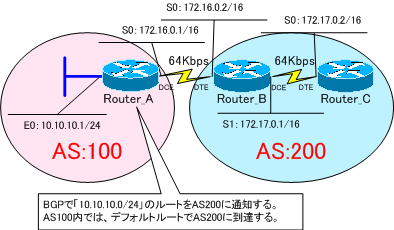
ここでは、「BGPの応用設定(その1)」で構築したBGPネットワークを利用して、iBGP、eBGPの確認を行います。
BGPでは、
- AS内ルーティングを行う内部BGP(iBGP)
- AS間のルーティングを行う外部BGP(eBGP)
の2つの形態でルーティングを行っています。
つまり
●AS内部
iBGPで、同じAS内のBGPスピーカーとピア張る。
●外部AS間
eBGPで、各ASのBGPスピーカーとピアを張る。

それでは、BGPのピアを確認してみます。
ルータのピア接続の詳細を確認するには、「show ip bgp neighbors」コマンドを使用します。
Router_Bで、「show ip bgp neighbors」コマンドを実行してみます。
Router_B#show ip bgp neighbors
BGP neighbor is 172.16.0.1,  remote AS 100, external link
 Index 1, Offset 0, Mask 0x2
  BGP version 4, remote router ID 172.16.0.1
  BGP state = Established, table version = 2, up for 00:24:59
  Last read 00:00:59, hold time is 180, keepalive interval is 60 seconds
  Minimum time between advertisement runs is 30 seconds
  Received 28 messages, 0 notifications, 0 in queue
  Sent 27 messages, 0 notifications, 0 in queue
  Connections established 1; dropped 0
Connection state is ESTAB, I/O status: 1, unread input bytes: 0
Local host: 172.16.0.2, Local port: 11001
Foreign host: 172.16.0.1, Foreign port: 179

(途中略)

BGP neighbor is 172.17.0.2,  remote AS 200, internal link
 Index 0, Offset 0, Mask 0x0
  BGP version 4, remote router ID 172.17.0.2
  BGP state = Established, table version = 2, up for 00:24:44
  Last read 00:00:44, hold time is 180, keepalive interval is 60 seconds
  Minimum time between advertisement runs is 5 seconds
  Received 27 messages, 0 notifications, 0 in queue
  Sent 28 messages, 0 notifications, 0 in queue
  Connections established 1; dropped 0
Connection state is ESTAB, I/O status: 1, unread input bytes: 0
Local host: 172.17.0.1, Local port: 11000
Foreign host: 172.17.0.2, Foreign port: 179

(以下省略)
上の黄色のマークから分かるように、
- AS100へは、Router_A(172.16.0.1)とピアを張っている。
- AS200へは、Router_C(172.17.0.2)とピアを張っている。
ことが確認できます。
また、
BGP neighbor is 172.16.0.1, remote AS 100, external link
から、Router_Aとは、eBGPでピアを張っていること
BGP neighbor is 172.17.0.2, remote AS 200, internal link
から、Router_Cとは、iBGPでピアを張っていることが分かります。
ここで、Router_Bで行ったBGPのピアの設定を思い出してみます。
Router_B(config-router)#neighbor 172.16.0.1 remote-as 100
Router_B(config-router)#neighbor 172.17.0.2 remote-as 200
と設定しました。BGPのピアを設定する際に、eBGPでピアを張るのか、iBGPでピアを張るのかの指定は、特に行いませんでした。
Router_Bは、AS200に所属しています。
つまり、自分と同じASの時には、iBGPで、違うASの時には、eBGPで自動的にピアを確立するようになっています。
次の「BGPの応用設定(その4)」では、eBGPで学習した経路への「Next Hop」を自分のIPアドレスに変更して通知する方法を紹介します。
関連コンテンツ
- BGPの応用設定(その1) ※PT未対応
- BGPの応用設定(その2) ※PT未対応
- BGPの応用設定(その3) ※PT未対応
- BGPの応用設定(その4) ※PT未対応
