このページで解説している内容は、以下の YouTube 動画の解説で見ることができます。
マルチエリアOSPF(マルチエリア構成例②:R4~R6)
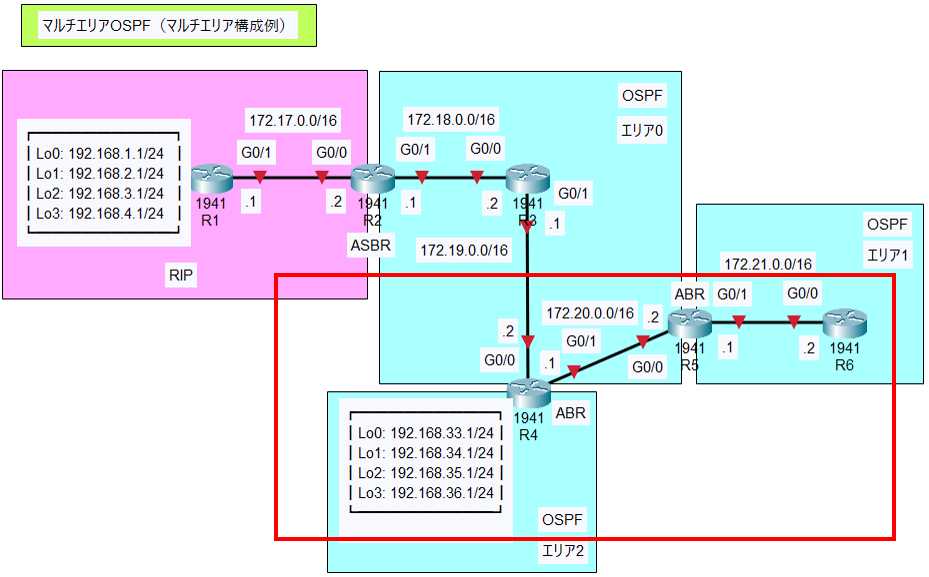
ここでは、下図の赤枠内のネットワークを設定していきます。R4ルータ、R5ルータ、R6ルータの設定を行います。

基本設定
R4ルータ、R5ルータ、R6ルータの基本設定は以下のとおりです。ABRであるR4ルータの設定は、後で行います。
R4ルータのループバックインターフェイスには、「ip ospf network point-to-point」コマンドで、ネットワークタイプを「 POINT-TO-POINT」 に変更します。
●R4のコンフィグ
Router>enable
Router#conf t
Router(config)#hostname R4
R4(config)#int lo0
R4(config-if)#ip address 192.168.33.1 255.255.255.0
R4(config-if)#ip ospf network point-to-point
R4(config-if)#int lo1
R4(config-if)#ip address 192.168.34.1 255.255.255.0
R4(config-if)#ip ospf network point-to-point
R4(config-if)#int lo2
R4(config-if)#ip address 192.168.35.1 255.255.255.0
R4(config-if)#ip ospf network point-to-point
R4(config-if)#int lo3
R4(config-if)#ip address 192.168.36.1 255.255.255.0
R4(config-if)#ip ospf network point-to-point
R4(config-if)#int g0/0
R4(config-if)#ip address 172.19.0.2 255.255.0.0
R4(config-if)#no shutdown
R4(config-if)#int g0/1
R4(config-if)#ip address 172.20.0.1 255.255.0.0
R4(config-if)#no shutdown
R4(config-if)#router ospf 1
R4(config-router)#network 172.19.0.0 0.0.255.255 area 0
R4(config-router)#network 172.20.0.0 0.0.255.255 area 0
R4(config-router)#network 192.168.33.0 0.0.0.255 area 2
R4(config-router)#network 192.168.34.0 0.0.0.255 area 2
R4(config-router)#network 192.168.35.0 0.0.0.255 area 2
R4(config-router)#network 192.168.36.0 0.0.0.255 area 2
R4(config-router)#end
R4#copy run start
●R5のコンフィグ
Router>enable
Router#conf t
Router(config)#hostname R5
R5(config)#int g0/0
R5(config-if)#ip address 172.20.0.2 255.255.0.0
R5(config-if)#no shutdown
R5(config-if)#int g0/1
R5(config-if)#ip address 172.21.0.1 255.255.0.0
R5(config-if)#no shutdown
R5(config-router)#end
R5#copy run start
●R6のコンフィグ
Router>enable
Router#conf t
Router(config)#hostname R6
R6(config)#int g0/0
R6(config-if)#ip address 172.21.0.2 255.255.0.0
R6(config-if)#no shutdown
R6(config-if)#router ospf 1
R6(config-router)#network 172.21.0.0 0.0.255.255 area 1
R6(config-router)#end
R6#copy run start
ABRルータの設定(R4ルータ・R5ルータ)
R4ルータにはOSPFのエリア0、エリア2を、R5ルータではOSPFのエリア0、エリア1の設定を行います。
OSPFを動作させるには、グローバルコンフィギュレーションモードで「router ospf」コマンドを入力します。
Router(config)#router ospf {プロセス番号}
Router(config-router)#network {network} {wildcard} area 0
Router(config-router)#network {network} {wildcard} area {area-id}
プロセス番号: 1~65535
ABRは、バックボーンエリアと接続します。networkコマンドで、「area 0」の指定が必須となります。後は、他の接続するエリアを追加していくようになります。
プロセス番号は、OSPFプロセスを管理する番号で、各ルータで合わせておく必要はありません。プロセス番号は、OSPFプロセスを管理するためのものです。IGRPやEIGRPのAS番号とは違います。また、エリア番号と合わせる要もありません。
R5ルータは、エリア0とエリア1の両方のトポロジデータベースを構築し、エリア間の通信を行います。
R4ルータのOSPFの設定
R4(config)#router ospf 1
R4(config-if)#router ospf 1
R4(config-router)#network 172.19.0.0 0.0.255.255 area 0
R4(config-router)#network 172.20.0.0 0.0.255.255 area 0
R4(config-router)#network 192.168.33.0 0.0.0.255 area 2
R4(config-router)#network 192.168.34.0 0.0.0.255 area 2
R4(config-router)#network 192.168.35.0 0.0.0.255 area 2
R4(config-router)#network 192.168.36.0 0.0.0.255 area 2
R5ルータのOSPFの設定
R5(config)#router ospf 1
R5(config-router)#network 172.20.0.0 0.0.255.255 area 0
R5(config-router)#network 172.21.0.0 0.0.255.255 area 1
これで、R1ルータ~R6ルータの全ての設定が完了です。動作検証は、次の「マルチエリアOSPF(マルチエリア構成例②:R4~R6)」で解説します。
