このページで解説している内容は、以下の YouTube 動画の解説で見ることができます。
演習ファイルのダウンロード
ネットワークの構成を Packet Tracer で一から設定していくのは大変かと思います。「ダウンロード」から演習で使用するファイルのダウンロードができます。ファイルは、McAfee インターネットセキュリティでウイルスチェックをしておりますが、ダウンロードは自己責任でお願いいたします。
Multiple HSRP その2
ここではMultiple HSRPを設定していきます。
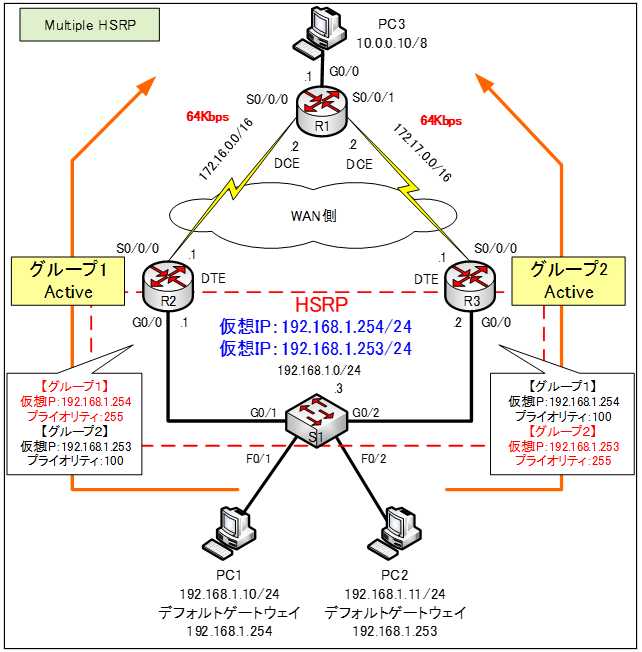
使用するネットワークは、下の構成になります。

基本設定
まずは、ホスト名やIPv4アドレス、HSRPなどの基本設定を行います。各ルータやスイッチの設定は以下のとおりです。
●R1のコンフィグ
Router>enable
Router#conf t
Router(config)#hostname R1
R1(config)#int g0/0
R1(config-if)#ip address 10.0.0.1 255.0.0.1
R1(config-if)#no shutdown
R1(config-if)#int s0/0/0
R1(config-if)#ip address 172.16.0.2 255.255.0.0
R1(config-if)#clock rate 64000
R1(config-if)#bandwidth 64
R1(config-if)#no shutdown
R1(config-if)#int s0/0/1
R1(config-if)#ip address 172.17.0.2 255.255.0.0
R1(config-if)#clock rate 64000
R1(config-if)#bandwidth 64
R1(config-if)#no shutdown
R1(config-if)#router ospf 1
R1(config-router)#passive-interface g0/0
R1(config-router)#network 0.0.0.0 255.255.255.255 area 0
R1(config-router)#end
R1#copy run start
●R2のコンフィグ
Router>enable
Router#conf t
Router(config)#hostname R2
R2(config)#int g0/0
R2(config-if)#ip address 192.168.1.1 255.255.255.0
R2(config-if)#no shutdown
R2(config-if)#int s0/0/0
R2(config-if)#ip address 172.16.0.1 255.255.0.0
R2(config-if)#no shutdown
R2(config-if)#router ospf 1
R2(config-router)#passive-interface g0/0
R2(config-router)#network 0.0.0.0 255.255.255.255 area 0
R2(config-router)#end
R2#copy run start
●R3のコンフィグ
Router>enable
Router#conf t
Router(config)#hostname R3
R3(config)#int g0/0
R3(config-if)#ip address 192.168.1.2 255.255.255.0
R3(config-if)#no shutdown
R3(config-if)#int s0/0/0
R3(config-if)#ip address 172.17.0.1 255.255.0.0
R3(config-if)#no shutdown
R3(config-if)#router ospf 1
R3(config-router)#passive-interface g0/0
R3(config-router)#network 0.0.0.0 255.255.255.255 area 0
R3(config-router)#end
R3#copy run start
●S1のコンフィグ
Switch>enable
Switch#conf t
Switch(config)#hostname S1
S1(config)#ip default-gateway 192.168.1.3
S1(config)#int vlan 1
S1(config-if)#ip address 192.168.1.3 255.255.255.0
S1(config-if)#no shutdown
S1(config-if)#end
S1#copy run start
Multiple HSRP(MHSRP)の設定
「Multiple HSRP(MHSRP)」では、1つのルータを複数のHSRPグループのメンバーにすることができます。
1つのルータを複数のHSRPグループに所属させることができます。複数のデフォルトゲートウェイを用意することで、冗長性を高めると共に、ロードシェアリングを行うことができます。
MHSRPにより、1つのルータがあるHSRPグループのActiveルータとして働き、別のHSRPグループのStandbyルータとして機能するようになります。
今回は、下の表のようにHSRPグループを設定していきます。
| ルータ/HSRPグループ | HSRP Group 1 192.168.1.254 | HSRP Group 2 192.168.1.253 |
| R2 | Active (プライオリティ255) | Standby(プライオリティ100) |
| R3 | Standby(プライオリティ100) | Active (プライオリティ255) |
●R2のHSRPの設定
R2(config)#interface g0/0
R2(config-if)#standby 1 ip 192.168.1.254
R2(config-if)#standby 1 priority 255
R2(config-if)#standby 2 ip 192.168.1.253
※プライオリティの設定を省略すると100になります。
●R3のHSRPの設定
R3(config)#interface g0/0
R3(config-if)#standby 1 ip 192.168.1.254
R3(config-if)#standby 2 ip 192.168.1.253
R3(config-if)#standby 2 priority 255
※プライオリティの設定を省略すると100になります。
まずは、すべての機器を再起動させます。下図の「Power Cycle Devices」ボタンをクリックします。これは、ルータへのHSRPの設定が完了した順が、Activeルータの選出に影響しているからです。

次の「Multiple HSRP その3」では、設定したMHSRPを検証していきます。
