このページで解説している内容は、以下の YouTube 動画の解説で見ることができます。
演習ファイルのダウンロード
ネットワークの構成を Packet Tracer で一から設定していくのは大変かと思います。「ダウンロード」から演習で使用するファイルのダウンロードができます。ファイルは、McAfee インターネットセキュリティでウイルスチェックをしておりますが、ダウンロードは自己責任でお願いいたします。
HSRP(インターフェイストラッキング①設定)
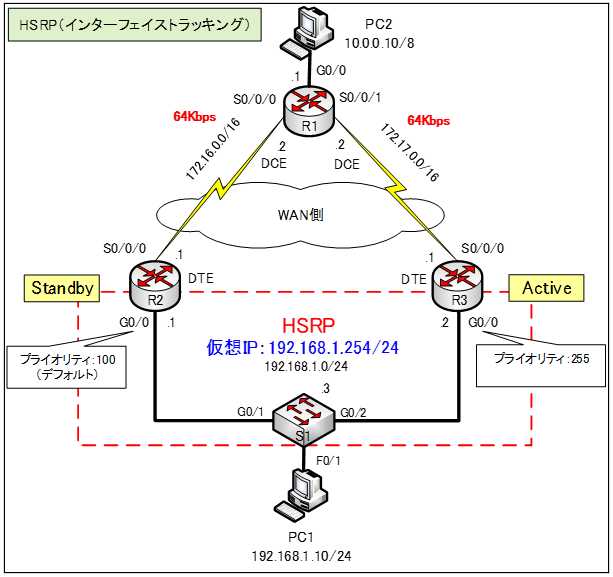
まず、下図のネットワークをHSRPで設定していきます。

基本設定
まずは、ホスト名やIPv4アドレス、HSRPなどの基本設定を行います。各ルータやスイッチの設定は以下のとおりです。
●R1のコンフィグ
Router>enable
Router#conf t
Router(config)#hostname R1
R1(config)#int g0/0
R1(config-if)#ip address 10.0.0.1 255.0.0.1
R1(config-if)#no shutdown
R1(config-if)#int s0/0/0
R1(config-if)#ip address 172.16.0.2 255.255.0.0
R1(config-if)#clock rate 64000
R1(config-if)#bandwidth 64
R1(config-if)#no shutdown
R1(config-if)#int s0/0/1
R1(config-if)#ip address 172.17.0.2 255.255.0.0
R1(config-if)#clock rate 64000
R1(config-if)#bandwidth 64
R1(config-if)#no shutdown
R1(config-if)#router ospf 1
R1(config-router)#passive-interface g0/0
R1(config-router)#network 0.0.0.0 255.255.255.255 area 0
R1(config-router)#end
R1#copy run start
●R2のコンフィグ
Router>enable
Router#conf t
Router(config)#hostname R2
R2(config)#int g0/0
R2(config-if)#ip address 192.168.1.1 255.255.255.0
R2(config-if)#standby 1 ip 192.168.1.254
R2(config-if)#no shutdown
R2(config-if)#int s0/0/0
R2(config-if)#ip address 172.16.0.1 255.255.0.0
R2(config-if)#no shutdown
R2(config-if)#router ospf 1
R2(config-router)#passive-interface g0/0
R2(config-router)#network 0.0.0.0 255.255.255.255 area 0
R2(config-router)#end
R2#copy run start
●R3のコンフィグ
Router>enable
Router#conf t
Router(config)#hostname R3
R3(config)#int g0/0
R3(config-if)#ip address 192.168.1.2 255.255.255.0
R3(config-if)#standby 1 ip 192.168.1.254
R3(config-if)#standby 1 priority 255
R3(config-if)#no shutdown
R3(config-if)#int s0/0/0
R3(config-if)#ip address 172.17.0.1 255.255.0.0
R3(config-if)#no shutdown
R3(config-if)#router ospf 1
R3(config-router)#passive-interface g0/0
R3(config-router)#network 0.0.0.0 255.255.255.255 area 0
R3(config-router)#end
R3#copy run start
●S1のコンフィグ
Switch>enable
Switch#conf t
Switch(config)#hostname S1
S1(config)#ip default-gateway 192.168.1.3
S1(config)#int vlan 1
S1(config-if)#ip address 192.168.1.3 255.255.255.0
S1(config-if)#no shutdown
S1(config-if)#end
S1#copy run start
赤破線の部分をHSRPの設定をしています。しかし、LAN側は冗長化できますが、WAN側に障害が発生した場合に、問題が発生します。
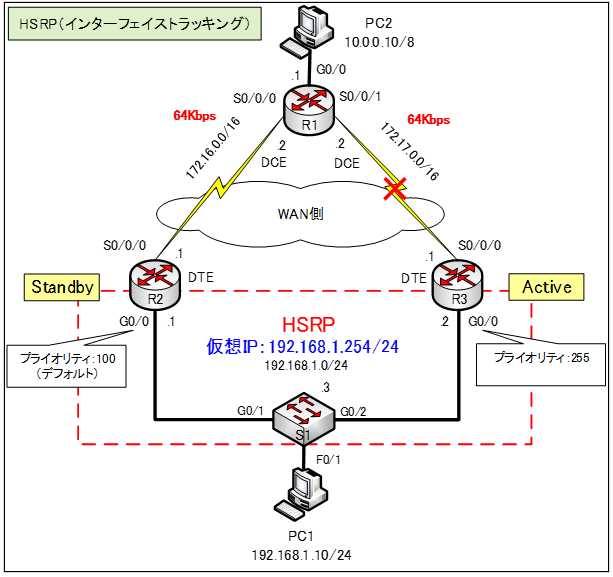
例えば、R3ルータのWAN側に障害が発生した場合、依然としてR3ルータは、Activeルータであり続けます。その結果、LAN側のホストが、WANにアクセスできない状況になってしまいます。
試しに、R1ルータとR3ルータを接続しているシリアルケーブルを削除してみます。

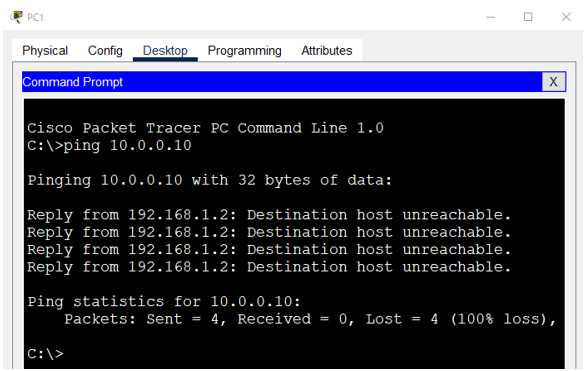
PC1から「10.0.0.10」へPingを行ってみます。
C:>ping 10.0.0.10

Activeルータが、R3ルータからR2ルータに切り替わらないため、Pingは失敗します。
R3ルータ側のWAN側で障害が発生した場合は、R2ルータがActiveルータに自動的に選出されれば、この問題を解決できそうですね。
HSRPでは、このような状況に対応できるように、インターフェイストラッキングという機能が用意されています。この機能を使用すると、特定のインターフェイスを監視して、そのインターフェイスがダウンするとプライオリティを下げることができます。
次の「HSRP(インターフェイストラッキング②検証)」で、インターフェイストラッキングを設定と検証を行います。
