このページで解説している内容は、以下の YouTube 動画の解説で見ることができます。
演習ファイルのダウンロード
ネットワークの構成を Packet Tracer で一から設定していくのは大変かと思います。「ダウンロード」から演習で使用するファイルのダウンロードができます。ファイルは、McAfee インターネットセキュリティでウイルスチェックをしておりますが、ダウンロードは自己責任でお願いいたします。
OSPF(Hello間隔・Dead間隔)
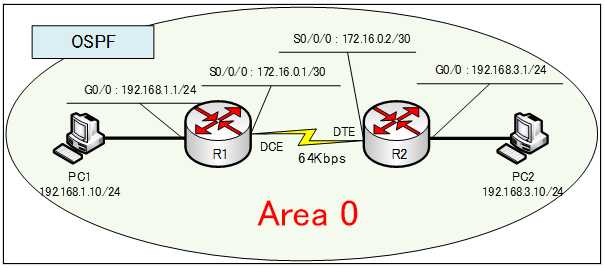
ここでは、「OSPFの設定例」で構築した下のネットワークを用いて、OSPF ネットワークにおける Hello 間隔と Dead 間隔の関係について解説していきます。

OSPF の学習プロセスが実行されて、ルーティングテーブルが完成すると、隣接関係を維持するために、マルチキャストアドレス「224.0.0.5」を使ってHello パケットを送信するようになります。
このHelloパケットを送信する間隔は、ネットワークの種類によって違ってきます。
●ブロードキャストネットワーク
- デフォルトの Hello 間隔 ・・・ 10秒
- デフォルトの Dead 間隔 ・・・ 40秒
●NBMAネットワーク
- デフォルトの Hello 間隔 ・・・ 30秒
- デフォルトの Dead 間隔 ・・・ 120秒
デフォルトでは、Dead 間隔は、Hello 間隔の値の4倍の値に設定されています。Dea d間隔とは、OSPF ルータが停止していると見なす時間です。Hello パケットが4回受信されないと無効であると判断します。
Hello 間隔、Dead 間隔の設定は、管理者が自由に設定することができますが、隣接ルータ間で一致していなければなりません。EIGRP では、異なる値でも問題ありませんでしたが、OSPF では、合わせておく必要があるので注意して下さい。
Hello 間隔・Dead 間隔の設定
Hello 間隔、Dead 間隔を設定するには、インターフェイスコンフィグレーションモードで下のコマンドを実行します。
Router(config-if)#ip ospf hello-interval {秒数}
Router(config-if)#ip ospf dead-interval {秒数}
それでは、R1ルータの Hello 間隔を変更するとどうなるか、確認してみましょう!
その前に、R1ルータの Hello 間隔、Dead 間隔を確認しておきます。
「show ip ospf interface」コマンドを入力します。
●「show ip ospf interface」コマンドの出力
R1#show ip ospf interface

GigabitEthernet0/0 is up, line protocol is up
  Internet address is 192.168.1.1/24, Area 0
  Process ID 1, Router ID 192.168.1.1, Network Type BROADCAST, Cost: 1
  Transmit Delay is 1 sec, State DR, Priority 1
  Designated Router (ID) 192.168.1.1, Interface address 192.168.1.1
  No backup designated router on this network
  Timer intervals configured, Hello 10, Dead 40, Wait 40, Retransmit 5
    Hello due in 00:00:08
  Index 1/1, flood queue length 0
  Next 0x0(0)/0x0(0)
  Last flood scan length is 1, maximum is 1
  Last flood scan time is 0 msec, maximum is 0 msec
  Neighbor Count is 0, Adjacent neighbor count is 0
  Suppress hello for 0 neighbor(s)
Serial0/0/0 is up, line protocol is up
  Internet address is 172.16.0.1/30, Area 0
  Process ID 1, Router ID 192.168.1.1, Network Type POINT-TO-POINT, Cost: 1562
  Transmit Delay is 1 sec, State POINT-TO-POINT,
  Timer intervals configured, Hello 10, Dead 40, Wait 40, Retransmit 5
    Hello due in 00:00:08
  Index 2/2, flood queue length 0
  Next 0x0(0)/0x0(0)
  Last flood scan length is 1, maximum is 1
  Last flood scan time is 0 msec, maximum is 0 msec
  Neighbor Count is 1 , Adjacent neighbor count is 1
    Adjacent with neighbor 192.168.3.1
  Suppress hello for 0 neighbor(s)
Serial0/0/0 の「Hello間隔 = 10」、「Dead間隔 = 40」になっています。
Hello 間隔・Dead 間隔の変更
それでは、Hello間隔を 5 、Dead間隔を 20に変更してみます。
R1ルータで次のコマンドを入力します。
R1(config)#interface serial 0/0/0
R1(config-if)#ip ospf hello-interval 5
R1(config-if)#ip ospf dead-interval 20
そこで、もう一度、「show ip ospf interface」コマンドを入力します。
●「show ip ospf interface」コマンドの出力
R1#show ip ospf interface

GigabitEthernet0/0 is up, line protocol is up
  Internet address is 192.168.1.1/24, Area 0
  Process ID 1, Router ID 192.168.1.1, Network Type BROADCAST, Cost: 1
  Transmit Delay is 1 sec, State DR, Priority 1
  Designated Router (ID) 192.168.1.1, Interface address 192.168.1.1
  No backup designated router on this network
  Timer intervals configured, Hello 10, Dead 40, Wait 40, Retransmit 5
    Hello due in 00:00:01
  Index 1/1, flood queue length 0
  Next 0x0(0)/0x0(0)
  Last flood scan length is 1, maximum is 1
  Last flood scan time is 0 msec, maximum is 0 msec
  Neighbor Count is 0, Adjacent neighbor count is 0
  Suppress hello for 0 neighbor(s)
Serial0/0/0 is up, line protocol is up
  Internet address is 172.16.0.1/30, Area 0
  Process ID 1, Router ID 192.168.1.1, Network Type POINT-TO-POINT, Cost: 1562
  Transmit Delay is 1 sec, State POINT-TO-POINT,
  Timer intervals configured, Hello 5, Dead 20, Wait 20, Retransmit 5
    Hello due in 00:00:01
  Index 2/2, flood queue length 0
  Next 0x0(0)/0x0(0)
  Last flood scan length is 1, maximum is 1
  Last flood scan time is 0 msec, maximum is 0 msec
  Suppress hello for 0 neighbor(s)
Serial0がHello間隔が 5、Dead間隔が5になっています。
R1ルータ、R2ルータのルーティングテーブルを確認します。
●R1ルータのルーティングテーブル
R1#show ip route
Codes: L - local, C - connected, S - static, R - RIP, M - mobile, B - BGP
       D - EIGRP, EX - EIGRP external, O - OSPF, IA - OSPF inter area
       N1 - OSPF NSSA external type 1, N2 - OSPF NSSA external type 2
       E1 - OSPF external type 1, E2 - OSPF external type 2, E - EGP
       i - IS-IS, L1 - IS-IS level-1, L2 - IS-IS level-2, ia - IS-IS inter area
       * - candidate default, U - per-user static route, o - ODR
       P - periodic downloaded static route

Gateway of last resort is not set

     172.16.0.0/16 is variably subnetted, 2 subnets, 2 masks
C       172.16.0.0/30 is directly connected, Serial0/0/0
L       172.16.0.1/32 is directly connected, Serial0/0/0
     192.168.1.0/24 is variably subnetted, 2 subnets, 2 masks
C       192.168.1.0/24 is directly connected, GigabitEthernet0/0
L       192.168.1.1/32 is directly connected, GigabitEthernet0/0
●R2ルータのルーティングテーブル
R2#show ip route
Codes: L - local, C - connected, S - static, R - RIP, M - mobile, B - BGP
       D - EIGRP, EX - EIGRP external, O - OSPF, IA - OSPF inter area
       N1 - OSPF NSSA external type 1, N2 - OSPF NSSA external type 2
       E1 - OSPF external type 1, E2 - OSPF external type 2, E - EGP
       i - IS-IS, L1 - IS-IS level-1, L2 - IS-IS level-2, ia - IS-IS inter area
       * - candidate default, U - per-user static route, o - ODR
       P - periodic downloaded static route

Gateway of last resort is not set

     172.16.0.0/16 is variably subnetted, 2 subnets, 2 masks
C       172.16.0.0/30 is directly connected, Serial0/0/0
L       172.16.0.2/32 is directly connected, Serial0/0/0
     192.168.3.0/24 is variably subnetted, 2 subnets, 2 masks
C       192.168.3.0/24 is directly connected, GigabitEthernet0/0
L       192.168.3.1/32 is directly connected, GigabitEthernet0/0
隣接関係が結べなくなったために、OSPFによるルートが消えています。
OSPFネットワークでは、隣接ルータ間で、合わせておかなけらばならないことが分かります。
次の「OSPF(検証コマンド)」では、OSPF の検証コマンドについて解説していきます。
演習ファイル(完了)のダウンロード
ネットワークの構成を Packet Tracer で一から設定していくのは大変かと思います。「ダウンロード」から演習を完了させたファイルのダウンロードができます。ファイルは、McAfee インターネットセキュリティでウイルスチェックをしておりますが、ダウンロードは自己責任でお願いいたします。
