このページで解説している内容は、以下の YouTube 動画の解説で見ることができます。
ネットワーク構成
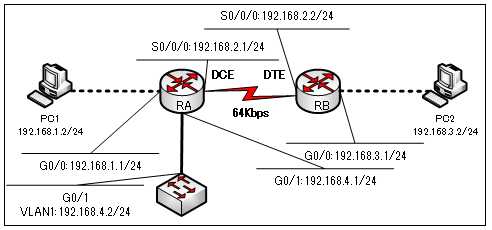
ネットワークの構成は、下図のとおりです。

演習ファイルのダウンロード
ネットワークの構成を Packet Tracer で一から設定していくのは大変かと思います。「ダウンロード」から演習で使用するファイルのダウンロードができます。ファイルは、McAfeeインターネットセキュリティでウイルスチェックをしておりますが、ダウンロードは自己責任でお願いいたします。
ダウンロードファイルは、既に上図のネットワーク構成の設定を済ませています。
上図のネットワーク構成は、「show interfaces コマンド」で解説に使用したネットワーク構成にスイッチを追加してものです。
スイッチにIPアドレスを割り当てるには、VLANインターフェイスにIPアドレスを設定していくようになります。以下のコマンドで設定します。
S1(config)#interface vlan 1
S1(config-if)#ip address 192.168.4.2 255.255.255.0
S1(config-if)#no shutdown
show ip interface brief コマンド
ルータが装備している全てのインターフェイスのステータスを表示するコマンドには、「show interfaces」コマンドがあるのですが、このコマンドの出力が、少々長いのが難点です。
途中で
「 --More--」
が出力されて何回もスクロールしなければなりません。
とりあえず、物理層、データリンク層の「up」「down」を知りたい時に便利なのが、以下のコマンドです。
Router#show ip interface brief
briefとは、簡単な、手短な、簡潔な、という意味の単語です。
ルータに搭載されている全てのインターフェイスのステータスを要約して表示することができます。
RA#show ip interface brief
●RAでの「show ip interface brief」コマンドの出力
RA#show ip interface brief
Interface              IP-Address      OK? Method Status                Protocol
GigabitEthernet0/0     192.168.1.1     YES manual up                    up
GigabitEthernet0/1     192.168.4.1     YES manual up                    up
Serial0/0/0            192.168.2.1     YES manual up                    up
Serial0/0/1            unassigned      YES unset  administratively down down
Vlan1                  unassigned      YES unset  administratively down down
●S1での「show ip interface brief」コマンドの出力
ルータは、インターフェイスの数が少ないため、「show interfaces」 コマンドを使ってもスクロールする数は、たかが知れています。しかし、スイッチは、数多くのインターフェイスを備えています。スイッチで「show interfaces」 コマンドを使うと、ものすごくスクロールをする羽目となります。
スイッチでは、「show ip interface brief」コマンドが重宝することでしょう。
S1#show ip interface brief
Interface              IP-Address      OK? Method Status                Protocol
FastEthernet0/1        unassigned      YES manual down                  down
FastEthernet0/2        unassigned      YES manual down                  down
FastEthernet0/3        unassigned      YES manual down                  down
FastEthernet0/4        unassigned      YES manual down                  down
FastEthernet0/5        unassigned      YES manual down                  down
FastEthernet0/6        unassigned      YES manual down                  down
FastEthernet0/7        unassigned      YES manual down                  down
FastEthernet0/8        unassigned      YES manual down                  down
FastEthernet0/9        unassigned      YES manual down                  down
FastEthernet0/10       unassigned      YES manual down                  down
FastEthernet0/11       unassigned      YES manual down                  down
FastEthernet0/12       unassigned      YES manual down                  down
FastEthernet0/13       unassigned      YES manual down                  down
FastEthernet0/14       unassigned      YES manual down                  down
FastEthernet0/15       unassigned      YES manual down                  down
FastEthernet0/16       unassigned      YES manual down                  down
FastEthernet0/17       unassigned      YES manual down                  down
FastEthernet0/18       unassigned      YES manual down                  down
FastEthernet0/19       unassigned      YES manual down                  down
FastEthernet0/20       unassigned      YES manual down                  down
FastEthernet0/21       unassigned      YES manual down                  down
FastEthernet0/22       unassigned      YES manual down                  down
FastEthernet0/23       unassigned      YES manual down                  down
FastEthernet0/24       unassigned      YES manual down                  down
GigabitEthernet0/1     unassigned      YES manual up                    up
GigabitEthernet0/2     unassigned      YES manual down                  down
Vlan1                  192.168.4.2     YES manual up                    up
慌てて設定するとついつい忘れてしまうのが
- 「no shutdown」コマンド
- データリンク層のカプセル化の指定
- 「clock rate」コマンド
などです。
「show ip interface brief」コマンドを使えば、そんな、うっかりミスも直ぐに見つけることができます。
ちなみに、物理層、データリンク層の「up」「down」を知ることによって以下ような原因を推測することができます。
●物理層とデータリンク層の状態
| 物理層 | データリンク層 | インターフェイスの状態 | トラブルの原因 |
| up | up | 問題なし | 問題なし |
| up | down | データリンク層の問題 | ・カプセル化の間違い ・クロックレートの問題 ・キープアライブの失敗 |
| down | down | 物理層の問題 | ・ケーブル破損 ・ケーブル配線 ・インターフェイスの破損 |
| administratively down | down | 管理者が意図的にダウンさせている。 | ・管理目的でインターフェイスをshutdownしている。 |
| down | up | ありえません。 | 物理層がdownすれば、必ずデータリンク層もダウンしま。 |
「show ip interface brief」コマンドは、便利なコマンドなので覚えておきましょう!
