BGP(ルートリフレクションの設定)
ルートリフレクションの設定では、どのBGPスピーカをルートリフレクタにするかを決定し、そのルートリフレクタに、どのルータをルートリフレクタ・クライアントにするのかをコマンドで指定します。
コマンドは、以下のようになります。
ルートリフレクタの設定
ルートリフレクタ・クライアントになるピアの数だけ指定します。
Router#(config-router)#neighbor {peer_address} route-reflector-clien
ルートリフレクタ・クライアントの設定
ルートリフレクタ・クライアントの設定に変わりはありません。通常のBGPの設定を行います。
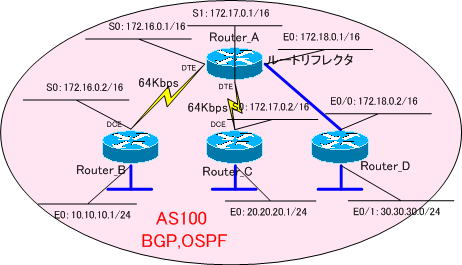
設定のコマンドが、理解できたところで、下のネットワークを使って、ルートリフレクションの設定を行っていきます。

Router_Aをルートリフレクタにします。
●Router_Aの設定
Router_A#(config)#router bgp 100
Router_A#(config-router)#no synchronization
Router_A#(config-router)#neighbor 172.16.0.2 route-reflector-client
Router_A#(config-router)#neighbor 172.17.0.2 route-reflector-client
それでは、各ルータを設定していきます。各ルータの設定は、以下のようになります。
強制的にインターフェイスをUPさせるために、Router_A~Router_CのE0インターフェイスで「no keepalive」コマンドを設定しておきます。
●Router_Aの設定
!
version 11.2
no service udp-small-servers
no service tcp-small-servers
!
hostname Router_A
!
enable password cisco
!
ip subnet-zero
!
interface Ethernet0
 ip address 172.18.0.1 255.255.0.0
!
interface Serial0
 ip address 172.16.0.1 255.255.0.0
!
interface Serial1
 ip address 172.17.0.1 255.255.0.0
!
router ospf 1
 network 0.0.0.0 255.255.255.255 area 0
!
router bgp 100
 no synchronization
 neighbor 172.16.0.2 remote-as 100
 neighbor 172.16.0.2 route-reflector-client
 neighbor 172.17.0.2 remote-as 100
 neighbor 172.17.0.2 route-reflector-client
 neighbor 172.18.0.2 remote-as 100
 neighbor 172.18.0.2 route-reflector-client
 no auto-summary
!
ip classless
!
line con 0
line aux 0
line vty 0 4
 password cisco
 login
!
end
●Router_Bの設定
!
version 11.2
no service udp-small-servers
no service tcp-small-servers
!
hostname Router_B
!
enable password cisco
!
ip subnet-zero
!
interface Ethernet0
 ip address 10.10.10.1 255.255.255.0
 no keepalive
!
interface Serial0
 ip address 172.16.0.2 255.255.0.0
 clockrate 64000
!
router ospf 1
 network 0.0.0.0 255.255.255.255 area 0
!
router bgp 100
 no synchronization
 network 10.10.10.0 mask 255.255.255.0
 neighbor 172.16.0.1 remote-as 100
 no auto-summary
!
ip classless
!
line con 0
 exec-timeout 0 0
line aux 0
line vty 0 4
 password cisco
 login
!
end
●Router_Cの設定
!
version 11.2
no service udp-small-servers
no service tcp-small-servers
!
hostname Router_C
!
enable password cisco
!
ip subnet-zero
!
interface Ethernet0
 ip address 20.20.20.1 255.255.255.0
 no keepalive
!
interface Serial0
 ip address 172.17.0.2 255.255.0.0
 clockrate 64000
!
router ospf 1
 network 0.0.0.0 255.255.255.255 area 0
!
router bgp 100
 no synchronization
 network 20.20.20.0 mask 255.255.255.0
 neighbor 172.17.0.1 remote-as 100
 no auto-summary
!
ip classless
!
line con 0
 exec-timeout 0 0
line aux 0
line vty 0 4
 password cisco
 login
!
end
●Router_Dの設定
!
version 12.0
service timestamps debug uptime
service timestamps log uptime
no service password-encryption
!
hostname Router_D
!
enable password cisco
!
ip subnet-zero
!
interface Ethernet0/0
 ip address 172.18.0.2 255.255.0.0
!
interface Ethernet0/1
 ip address 30.30.30.1 255.255.255.0
 no keepalive
!
router ospf 1
 network 0.0.0.0 255.255.255.255 area 0
!
router bgp 100
 no synchronization
 network 30.30.30.0 mask 255.255.255.0
 neighbor 172.18.0.1 remote-as 100
 no auto-summary
!
ip classless
!
line con 0
 exec-timeout 0 0
 transport input none
line aux 0
line vty 0 4
 password cisco
 login
!
no scheduler allocate
end
これで、各ルータの設定は、完了しました。
それでは、ルートリフレクションが正しく設定されているかを確認していきます。
続きは、次の「BGP(ルートリフレクションの確認)」で確認を行います。
