BGP(同期化の設定 その1)
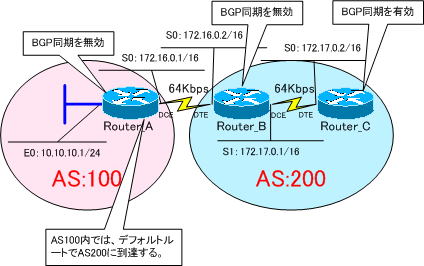
ここでは、下図のネットワークを使用してBGP同期を検証していきます。
BGP同期とは
- BGPで経路情報を受信しても、その経路情報をIGPで学習するまで有効にしない。
- iBGPとIGPの両方で、同じルートのアドバタイズを受けた時のみ、ルーティングテーブルに載せる。
機能のことです。
下図のネットワークをBGPで構築してゆきますが、
Router_A、Router_B ・・・ BGP同期を無効
Router_C ・・・ BGP同期を有効
にしておきます。

上図のネットワークをBGPで構築していきますが、
Router_A、Router_B ・・・ BGP同期を無効
Router_C ・・・ BGP同期を有効
にしておきます。
ルータの設定
また、ルーティングを簡素化するために、Router_Aでは、AS200へのルートをデフォルトルートで到達させるようにします。
Router_A(config)#ip route 0.0.0.0 0.0.0.0 172.16.0.2
Router_Bで次の設定を追加します。
Router_B(config-router)#neighbor 172.17.0.2 next-hop-self
このコマンドを追加することで、Router_B が、eBGPで学習した「10.10.10.0/24」経路の「Next Hop」を自分のインターフェイスで通知するようになります。
Router_A、Router_Bで、BGP同期を無効にします。
BGP同期を無効にするには、「no synchronization」コマンドを使います。
Router(config-router)#no synchronization
それでは、各ルータを設定してゆきます。
強制的にインターフェイスをUPさせるために、Router_AのE0インターフェイスで「no keepalive」コマンドを設定しておきます。
●Router_Aの設定
!
version 11.2
no service udp-small-servers
no service tcp-small-servers
!
hostname Router_A
!
enable password cisco
!
interface Ethernet0
 ip address 10.10.10.1 255.255.255.0
 no keepalive
!
interface Serial0
 ip address 172.16.0.1 255.255.0.0
 clockrate 64000
!
router bgp 100
 no synchronization
 network 10.10.10.0 mask 255.255.255.0
 neighbor 172.16.0.2 remote-as 200
 no auto-summary
!
ip classless
ip route 0.0.0.0 0.0.0.0 172.16.0.2
!
line con 0
line aux 0
line vty 0 4
 password cisco
 login
!
end
●Router_Bの設定
!
version 11.2
no service udp-small-servers
no service tcp-small-servers
!
hostname Router_B
!
enable password cisco
!
interface Serial0
 ip address 172.16.0.2 255.255.0.0
!
interface Serial1
 ip address 172.17.0.1 255.255.0.0
 clockrate 64000
!
router bgp 200
 no synchronization
 neighbor 172.16.0.1 remote-as 100
 neighbor 172.17.0.2 remote-as 200
 neighbor 172.17.0.2 next-hop-self
 no auto-summary
!
ip classless
!
line con 0
 exec-timeout 0 0
line aux 0
line vty 0 4
 password cisco
 login
!
end
●Router_Cの設定
!
version 11.2
no service udp-small-servers
no service tcp-small-servers
!
hostname Router_C
!
enable password cisco
!
interface Serial0
 ip address 172.17.0.2 255.255.0.0
!
router bgp 200
 neighbor 172.17.0.1 remote-as 200
 no auto-summary
!
ip classless
!
line con 0
 exec-timeout 0 0
line aux 0
line vty 0 4
 password cisco
 login
!
end
Router_CのBGPテーブルを確認してみます。
Router_C#show ip bgp
BGP table version is 2, local router ID is 172.17.0.2
Status codes: s suppressed, d damped, h history, * valid, > best, i - internal
Origin codes: i - IGP, e - EGP, ? - incomplete

   Network          Next Hop          Metric LocPrf Weight Path
*>i10.10.10.0/24    172.17.0.1             0    100      0 100 i
「10.10.10.0/24」の経路が、「>」よりベストパスになっているのが確認できます。
ところが、
Router_Cのルーティングテーブルを確認してみると
Gateway of last resort is not set

C    172.17.0.0/16 is directly connected, Serial0
iBGPで、「10.10.10.0/24」の経路を学習し、ベストパスになっているにも関わらず、ルーティングテーブルに載せられていません。
それは、Router_Cで、BGP同期が有効になっているからです。
BGP同期では、次のルールがありました。
iBGPとIGPの両方で、同じルートのアドバタイズを受けた時のみ、ルーティングテーブルに載せる。
というルールです。
その為、Router_Cで、「10.10.10.0/24」経路が反映されなかったのです。
「10.10.10.0/24」経路が反映させるには、Router_CでBGP同期を無効にする必要があります。
Router_CでBGP同期を無効にします。
Router_C(config-router)#no synchronization
ルーティングテーブルへの反映を早めるために次のコマンドを入力します。
Router_C(config)#clear ip bgp *
Router_Cで、再度ルーティングテーブルを確認してみます。
Gateway of last resort is not set

     10.0.0.0/24 is subnetted, 1 subnets
B       10.10.10.0 [200/0] via 172.17.0.1, 00:00:06
C    172.17.0.0/16 is directly connected, Serial0
「10.10.10.0/24」経路がルーティングテーブルに反映されました。
次の「BGP(同期化の設定 その2)」では、このネットワークをさらに拡張し、AS200を通過ASにして、BGP同期を検証していきます。
