IEEE802.1X(SwimRadius編 その4)
「IEEE802.1X(SwimRadius編 その3)」の続きです。ここでは、構築したIEEE802.1Xを検証していきます。
使用するネットワーク構成は、以下のようになります。

◆show dot1x all
IEEE802.1Xの状態を確認するには、「show dot1x all」コマンドを使用します。
●「show dot1x all」コマンドの出力
Switch_A#show dot1x all

Dot1x Info for interface FastEthernet0/1
----------------------------------------------------
Supplicant MAC <Not Applicable>
AuthSM State          = CONNECTING
BendSM State          = IDLE
Posture               = N/A
PortStatus            = UNAUTHORIZED
MaxReq                = 2
MaxAuthReq            = 2
HostMode              = Single
Port Control          = Auto
ControlDirection      = Both
QuietPeriod           = 60 Seconds
Re-authentication     = Disabled
ReAuthPeriod          = 3600 Seconds
ServerTimeout         = 30 Seconds
SuppTimeout           = 30 Seconds
TxPeriod              = 30 Seconds
Guest-Vlan            = 0
AuthFail-Vlan         = 0
AuthFail-Max-Attempts = 3
まだ、PC_Aを接続していないので、認証に関する情報は、表示されません。
◆PC_Aの接続
PC_AのケーブルをSwitch_Aに接続します。
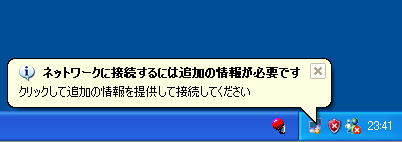
すると、「ネットワークに接続するには追加の情報が必要です」と吹き出しが表示されます。

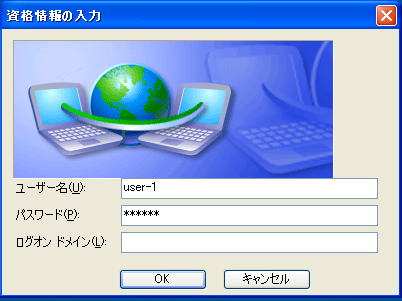
吹き出しをクリックすると「資格情報の入力」が表示されます。
ここで、IEEE802.1Xパケットのやり取りを確認するために、Switch_Aで「debug dot1x packets」コマンドを入力します。
◆debug dot1x packets
Switch_A#debug dot1x packets
吹き出しをクリックすると「資格情報の入力」が表示されます。
RADIUSサーバに登録した「user-1」アカウントで接続を試みます。

以下の項目を入力します。
・ユーザー名 : user-1
・パスワード : user-1

しばらく待つとPC_Aは、LANに接続されます。
デバックコマンド「debug dot1x packets」の出力は、次のように表示されます。
●debug dot1x packets
Switch_A#debug dot1x packets
Dot1x packet info debugging is on
Switch_A#
00:09:03: dot1x-packet:Tx EAP-Request(Id), id 1, ver 1, len 5 (Fa0/1)
00:09:03: dot1x-packet:Tx sa=0006.2afb.9f81, da=0180.c200.0003, et 888E (Fa0/1)
00:09:33: dot1x-packet:Tx EAP-Failure, id 1, ver 1, len 4 (Fa0/1)
00:09:33: dot1x-packet:Tx sa=0006.2afb.9f81, da=0180.c200.0003, et 888E (Fa0/1)
00:09:33: dot1x-packet:Tx EAP-Request(Id), id 2, ver 1, len 5 (Fa0/1)
00:09:33: dot1x-packet:Tx sa=0006.2afb.9f81, da=0180.c200.0003, et 888E (Fa0/1)
00:09:33: dot1x-packet:Tx EAP-Request(Id), id 2, ver 1, len 5 (Fa0/1)
00:09:33: dot1x-packet:Tx sa=0006.2afb.9f81, da=0180.c200.0003, et 888E (Fa0/1)
00:10:03: dot1x-packet:Tx EAP-Request(Id), id 2, ver 1, len 5 (Fa0/1)
00:10:03: dot1x-packet:Tx sa=0006.2afb.9f81, da=0180.c200.0003, et 888E (Fa0/1)
00:10:14: dot1x-packet:Rx EAP-Response(Id), id 2, ver 1, len 11 (Fa0/1)
00:10:14: dot1x-packet:Rx sa=001e.8cc8.0235, da=0180.c200.0003, et 888E (Fa0/1)
00:10:14: dot1x-packet:Tx EAP-Request(Id), id 0, ver 1, len 5 (Fa0/1)
00:10:14: dot1x-packet:Tx sa=0006.2afb.9f81, da=0180.c200.0003, et 888E (Fa0/1)
00:10:14: dot1x-packet:Rx EAP-Response(Id), id 0, ver 1, len 11 (Fa0/1)
00:10:14: dot1x-packet:Rx sa=001e.8cc8.0235, da=0180.c200.0003, et 888E (Fa0/1)
00:10:16: dot1x-packet:Tx EAP-Request(MD5), id 1, ver 1, len 22 (Fa0/1)
00:10:16: dot1x-packet:Tx sa=0006.2afb.9f81, da=0180.c200.0003, et 888E (Fa0/1)
00:10:16: dot1x-packet:Rx EAP-Response(MD5), id 1, ver 1, len 28 (Fa0/1)
00:10:16: dot1x-packet:Rx sa=001e.8cc8.0235, da=0180.c200.0003, et 888E (Fa0/1)
00:10:16: dot1x-packet:Tx EAP-Success, id 1, ver 1, len 4 (Fa0/1)
00:10:16: dot1x-packet:Tx sa=0006.2afb.9f81, da=0180.c200.0003, et 888E (Fa0/1)
00:10:17: %LINEPROTO-5-UPDOWN: Line protocol on Interface FastEthernet0/1, changed state to up
「EAP-Success」の表示から、分かるように、認証に成功すると「F0/1」がUPしていることが確認できます。
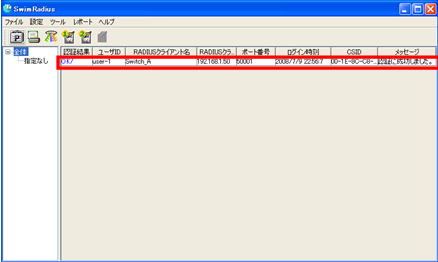
「SwimRadius」サーバ上で確認してみると、下の画面が表示されています。

PC_Aが認証されていることが確認できます。
IEEE802.1Xの状態を確認します。「show dot1x all」コマンドを入力します。
●「show dot1x all」コマンドの出力
Switch_A#show dot1x all

Dot1x Info for interface FastEthernet0/1
----------------------------------------------------
Supplicant MAC 001e.8cc8.0235
AuthSM State          = AUTHENTICATED
BendSM State          = IDLE
Posture               = N/A
PortStatus            = AUTHORIZED
MaxReq                = 2
MaxAuthReq            = 2
HostMode              = Single
Port Control          = Auto
ControlDirection      = Both
QuietPeriod           = 60 Seconds
Re-authentication     = Disabled
ReAuthPeriod          = 3600 Seconds
ServerTimeout         = 30 Seconds
SuppTimeout           = 30 Seconds
TxPeriod              = 30 Seconds
Guest-Vlan            = 0
AuthFail-Vlan         = 0
AuthFail-Max-Attempts = 3
黄色の網掛けの「PortStatus = AUTHORIZED」の表示から、「F0/1」ポートが認証されていることが分かります。
