※Packet Tracer 8.1.1 では、VRRP をサポートしていないため、ここでは、実機で検証した内容を紹介します。
VRRP(その3)
ここでは、VRRPを設定していきます。
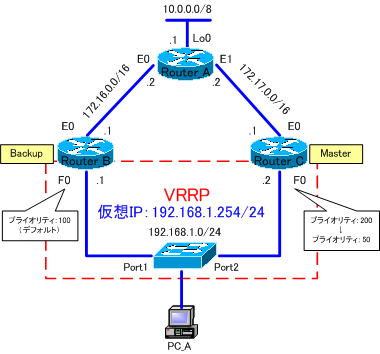
使用するネットワークは、下図の構成になります。
※検証には、IOS12.4を搭載しているCisco1710使用しています。HSRPは、割と多くのCiscoルータで使用することができますが、VRRPをサポートしていないものもありますので、注意して下さい。

Router_Cには、S0/0のダウンを検知して、プライオリティ値を下げるようにトラッキングの設定を行います。
●Router_BのVRRPの設定
Router_B(config)#interface f0
Router_B(config-if)#vrrp 1 ip 192.168.1.254
●Router_CのVRRPの設定
Router_C(config)#track 1 interface e0 line-protocol
Router_C(config-track)#exit
Router_C(config)#interface f0
Router_C(config-if)#vrrp 1 ip 192.168.1.254
Router_C(config-if)#vrrp 1 priority 200
Router_C(config-if)#vrrp 1 track 1 decrement 150
Router_B、Router_Cにおいて、VRRPグループ1に「192.168.1.254」の仮想IPアドレスを設定します。
Router_Bのプライオリティ値は設定しないので、デフォルト値の「100」になります。
Router_Cのプライオリティ値は、「200」を設定し、S0/0がダウンした場合には、150を減算して「50」になるようにします。
インターフェイストラッキングの設定は、HSRPとは、設定のアプローチが異なります。
HSRPでは、「standby」コマンドで直接、下のように監視するインターフェイスの指定ができました。
Router_C(config-if)#standby 1 track s0/0 200
しかし、VRRPでは、監視の対象となるオブジェクトを指定してか「track」オプションで指定する必要があります。
各ルータの設定は、以下のようになります。
●Router_Aの設定
!
version 11.2
no service udp-small-servers
no service tcp-small-servers
!
hostname Router_A
!
enable password cisco
!
ip subnet-zero
!
interface Loopback0
 ip address 10.0.0.1 255.0.0.0
!
interface Ethernet0
 ip address 172.16.0.2 255.255.0.0
!
interface Ethernet1
 ip address 172.17.0.2 255.255.0.0
!
router ospf 1
 network 0.0.0.0 255.255.255.255 area 0
!
ip classless
!
line con 0
 exec-timeout 0 0
 transport input none
line aux 0
line vty 0 4
 password cisco
 login
!
end
●Router_Bの設定
!
version 12.4
service timestamps debug datetime msec
service timestamps log datetime msec
no service password-encryption
!
hostname Router_B
!
boot-start-marker
boot-end-marker
!
enable password cisco
!
no aaa new-model
memory-size iomem 25
!
ip cef
!
interface Ethernet0
 ip address 172.16.0.1 255.255.0.0
 half-duplex
!
interface FastEthernet0
 ip address 192.168.1.1 255.255.255.0
 speed auto
 vrrp 1 ip 192.168.1.254
!
router ospf 1
 log-adjacency-changes
 passive-interface FastEthernet0
 network 0.0.0.0 255.255.255.255 area 0
!
ip forward-protocol nd
no ip http server
no ip http secure-server
!
control-plane
!
line con 0
 exec-timeout 0 0
line aux 0
line vty 0 4
 password cisco
 login
!
end
●Router_Cの設定
!
version 12.4
service timestamps debug datetime msec
service timestamps log datetime msec
no service password-encryption
!
hostname Router_C
!
boot-start-marker
boot-end-marker
!
enable password cisco
!
no aaa new-model
memory-size iomem 25
!
ip cef
!
track 1 interface Ethernet0 line-protocol
!
interface Ethernet0
 ip address 172.17.0.1 255.255.255.0
 half-duplex
!
interface FastEthernet0
 ip address 192.168.1.2 255.255.255.0
 speed auto
 vrrp 1 ip 192.168.1.254
 vrrp 1 priority 200
 vrrp 1 track 1 decrement 150
!
router ospf 1
 log-adjacency-changes
 passive-interface FastEthernet0
 network 0.0.0.0 255.255.255.255 area 0
!
ip forward-protocol nd
no ip http server
no ip http secure-server
!
control-plane
!
line con 0
 exec-timeout 0 0
line aux 0
line vty 0 4
 password cisco
 login
!
end
これで、VRRPの基本的な設定は、完了です。
設定したVRRPの検証は、「VRRP(その4)」~「VRRP(その6)」で行っていきます。
